Studio Setup 3
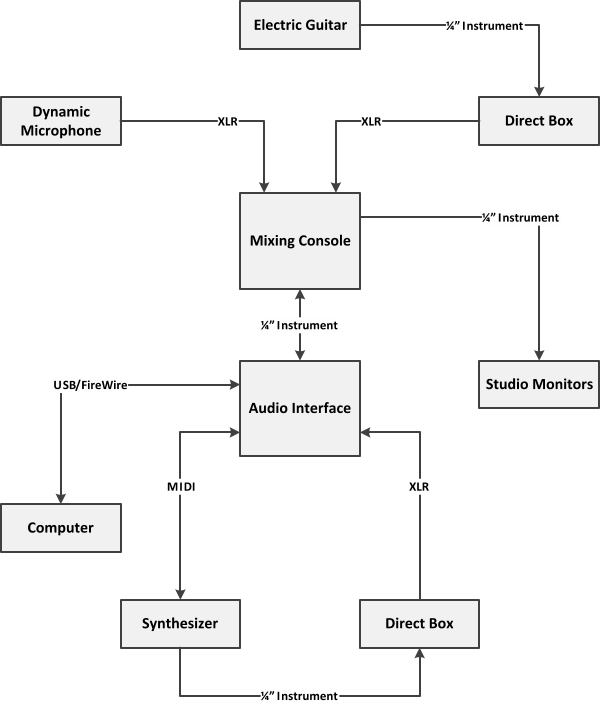
Studio Setup 3 adds the hardware based mixer to your home recording studio setup, taking the basic setup and adding some additional toys.
Here the Audio Interface supplies the A/D converters and serves as the MIDI Interface to the MIDI portion of the Synthesizer.
The output of the Mixing Console becomes the input to the Audio Interface - so this setup is for someone who wants to have the capability to set levels and monitor with physical hardware.
Although you have a hardware Mixing Console in this home studio setup diagram, you also have the Audio Interface's software based mixer at your disposal as well.
For this reason the interaction becomes a bit more complicated here.
Required Equipment:
- Electric Guitar
- Dynamic Microphone
- Computer
- Mixing Console
- Audio Interface
- Synthesizer
- Studio Monitors
- Direct Box
Required Cables:
- 1x USB or FireWire Cable
- 2x MIDI Cables
- 3x XLR Cables
- 6x 1/4" Instrument Cable
This setup is for those musicians who may already have a mixer they want to use as the front end, reserving the Audio Interface for its A/D converters and MIDI I/O only.
It gives the musician a lot of flexibility and added capability.
However, the added gadgets do come for a price... both in money and patience required to set this up correctly.
Remember that nowadays you don't need to have a hardware mixer as part of your home recording setup, so don't feel like this is essential.
Also if you're just starting out the learning curve of this may be frustrating so I'd consider this a more intermediate setup than the first 2.
If you determine that you want to make recording more of a permanent part of your free time then you won't be disappointed with this type of setup.
It also allows for expansion down the road if you decide that even this setup doesn't satiate your recording hunger.


